How To Create A Standee Design? Top Tips To Choose The Best Standee Size

How To Create A Standee Design_ Top Tips To Choose The Best Standee Size
In a world dominated by visual communication, businesses constantly search for effective and budget-friendly ways to capture attention. It doesn’t matter if it’s for launching a product, hosting an event, or setting up a promotional campaign, a well-designed standee can make a lasting impression.
This article will walk you through everything you need to know, from how to design a professional standee to choosing the right standee size, including how to select the appropriate standard standee size, and understanding standee size inches and standee size in pixels. Let’s dive into the essentials of designing the perfect standee that stands tall and speaks volumes.

Table of contents:

Introduction: What Is A Standee?

There’s a reason standees have been a staple in marketing campaigns for years. Their versatility and ability to instantly grab attention make them a favorite tool for both small and large businesses. But why are they so effective? Whether you’re a startup trying to make a mark or an established brand looking to reinforce your message, standees provide an impactful, budget-friendly solution.

Introduction What Is A Standee

1. Instant Visibility:

Due to their height and upright structure, standees naturally draw the eye. Whether placed at entrances, in corridors, or near booths, they’re hard to miss.

2. Highly Customizable:

Standees can be tailored to fit any theme, brand, or purpose. You can experiment with shapes, colors, sizes, and even interactive elements like QR codes.
Most standees are made from lightweight materials like PVC, foam board, or cardboard, making them easy to transport and set up.

4. Cost-Effective Branding:

Compared to digital signage or larger installations, standees are relatively inexpensive while still offering high returns in terms of visibility and brand recall.

5. Durability:

When made with quality materials, standees can last for months and be reused for multiple campaigns or events.

Who Benefits From Standee Designs?

Our standee designs are tailored to serve a wide range of businesses, professionals, and event organizers looking for high-impact visual marketing tools. Whether you’re promoting a product, hosting an event, or building brand awareness, a well-designed standee can elevate your visibility and engage your audience instantly.
Here’s who can benefit the most from our custom standee designs:

1. Retail Stores:

Standees are perfect for in-store promotions, product highlights, or announcing special discounts. A visually striking standee near the entrance or checkout counter can influence buying decisions and attract more foot traffic.

2. Event Organizers:

From corporate conferences to weddings and festivals, standees are ideal for guiding guests, displaying schedules, or highlighting sponsors. Our designs ensure your event branding is both professional and impactful.

3. Exhibitors and Trade Show Participants:

In a crowded exhibition hall, you need something that stands out. Standees help businesses attract booth visitors, showcase services, and reinforce their brand, all in one portable display.

4. Cinemas and Entertainment Venues:

Life-sized cutouts and promotional standees for new movies, shows, or performances capture attention and create buzz. We design with drama and detail to match the excitement of your release.

5. Startups and Small Businesses:

If you’re building brand visibility on a budget, standees offer a powerful, cost-effective way to make an impression. Whether it’s outside your store or at a pop-up event, a bold standee can do the talking.

6. Educational Institutions:

Schools, colleges, and training centers use standees for admission promotions, directional signage at events, or celebrating achievements like graduation or open house days.

7. Hospitality and Tourism:

Hotels, restaurants, and travel agencies use standees to welcome guests, promote offers, or highlight services. A visually appealing standee can enhance the customer experience and drive more inquiries.

Step-By-Step Guide: How To Create A Standee Design?

Creating a standee isn’t just about making something visually appealing; it’s about strategically designing a display that communicates your message clearly and attracts the right audience. Here’s a detailed step-by-step guide:

Step 1: Define The Purpose

Every great design starts with a clear objective. The first step of your standee design process should be determining the goal of the standee. Will you use the standee for a product launch? Are you offering a discount? Do you aim to direct people to your booth? Based on your objectives, you will be able to decide what to promote and how to arrange your layout.
Understanding the intent helps in choosing the right size, content hierarchy, and even positioning. For example, a standee for brand awareness will focus more on visuals and slogans, while one for lead generation may highlight offers and QR codes.

Step 2: Choose The Right Standee Size

The standee size plays a vital role in the overall impact of your display. It determines not only how noticeable your standee will be but also how well the information fits on it. Choosing the wrong size might result in a cluttered look or a design that feels too sparse. Some commonly used standard standee size options include:
Selecting the appropriate standee size in inches ensures your message is legible and well-balanced. Additionally, understanding standee size in pixels is crucial when designing digitally to avoid blurry or pixelated prints. It’s advisable to always consult with your printer to get the right specs for resolution.

Step 3: Plan The Layout

Designing a standee isn’t just about throwing text and images together. The layout must be clean, structured, and visually digestible from a distance. A strategic layout draws attention to the most important elements and guides the viewer’s eyes naturally.
Best practices:

Step 4: Choose The Right Colors And Fonts

For the perfect standee design, ensure your color and font choice align with your brand identity while ensuring visibility and readability. For instance, a bright yellow background may be great for a kids’ product, but inappropriate for a luxury brand.

Tips:
The goal is to be readable from several feet away, so always test your design at full size on-screen.

Step 5: Incorporate Branding Elements

A standee without clear branding is a missed opportunity. While the design may catch someone’s eye, it’s your branding that helps people remember who you are. Incorporating consistent brand elements like logos, taglines, and color schemes builds recognition, trust, and professionalism.
Ensure these elements are well-integrated and noticeable, but maintain balance so they do not overshadow the core message. A well-branded standee looks polished and purposeful, not crowded or confusing.

Here’s what to include:

Step 6: Use High-Resolution Images

Nothing damages your professional look more than pixelated graphics. Use high-quality images and design at actual size in high resolution. If your standee size in inches is 36 x 72, your canvas should be 5400 x 10800 pixels at 150 DPI.
Use vector graphics when possible, especially for logos and icons, as they scale without losing quality. For photos, make sure the image resolution supports your final print dimensions.

Step 7: Mock It Up

A mockup can help you see how the design will look in a real-world setting. Tools like Photoshop allow you to place your design on a realistic standee template. This helps catch issues with proportions, readability, and spacing before printing.

Mock-ups also make it easier to get client or stakeholder approval and prevent costly reprints.

Step 8: Print and Test

Once you’re satisfied with your design, send it to a trusted printer. Ensure you provide files in the required format, usually high-resolution PDFs or TIFFs with proper bleed and crop marks.

Ask for a test print or a sample if budget allows. This gives you a chance to assess color accuracy, material quality, and finishing options before mass production. You can get an ideal standee if you partner with the right marketing agency like Leadcrew!

How To Choose The Best Standee Size For Different Events?

How To Choose The Best Standee Size For Different Events
Different scenarios require different standee sizes. Here’s a breakdown to help you choose:

Trade Shows and Exhibitions:

Recommended standee size: 33 x 78 inches.
These offer a perfect balance between visibility and portability. They’re large enough to catch attention from afar, but compact enough to fit into small booth spaces.

Retail Stores and Promotions

Recommended standee size: 24 x 60 inches.
Ideal for placing near entrances or checkout counters. Their compact nature makes them suitable for high-footfall areas without blocking pathways.

Corporate Events and Seminars:

Recommended standee size: 36 x 72 inches.

Offers enough space for formal messaging, branding, and directions. You can also use them as speaker backdrops or sponsor highlights.

Outdoor Campaigns:

Recommended standee size: 48 x 96 inches.
Go big when going outdoors. These sizes provide maximum visibility from a distance. Ensure materials are weather-resistant and mounted on sturdy frames. Choosing a standard standee size also ensures smoother logistics, as many printers offer pre-set templates for these dimensions.

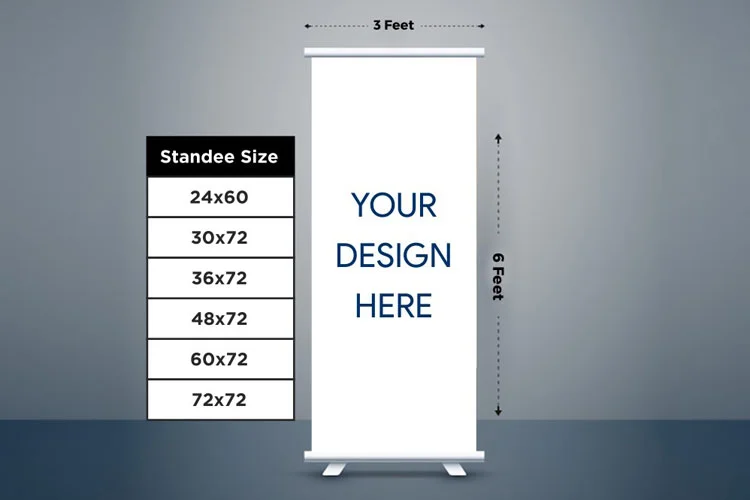
Common Standee Sizes and Their Applications

It’s always advisable to design your standee using the correct standee size in pixels to ensure sharp, high-quality prints without distortion or blurriness. Below is a brief look at common standee size inches and their ideal use cases.

Common Standee Sizes

Common Mistakes To Avoid When Designing A Standee

Even the most well-intentioned design can be irrelevant if a few crucial elements are overlooked. A standee is meant to grab attention and deliver a message quickly, any mistake can reduce its impact.

1. Wrong Size Selection:

Choosing the incorrect standee size is a frequent oversight. A small standee in a spacious venue may barely get noticed, while an oversized one can dominate or obstruct important areas. Always measure the display location and choose a standard standee size that fits the environment. The right size ensures your message is visible, balanced, and appropriate for the setting.

2. Overuse of Text:

Standees are meant for quick glances, not in-depth reading. When there’s too much information, viewers may ignore it altogether. Use short, impactful phrases or bullet points, and leave enough white space to let the design breathe. Focus on clarity and key messaging above all else.

3. Poor Resolution and Image Quality:

Low-resolution graphics can ruin your standee’s professional appearance. To ensure crisp, clean visuals, always design using the correct standee size in pixels. For most large-format prints, 150 DPI at full scale is the minimum, and vector files for logos and icons are strongly recommended. Fuzzy prints can damage credibility and reduce your visual impact.

4. Weak or Vague Calls to Action:

A beautiful standee with no clear next step is a missed opportunity. Viewers need direction, whether that’s visiting your website, scanning a QR code, or heading to a specific location. Don’t be vague; use strong, direct calls to action that tell people exactly what you want them to do, and make sure it’s easy to find and read.

5. Ignoring Brand Consistency:

It’s important to make sure your standee reflects your brand’s identity clearly and consistently. That includes using the right logos, brand colors, typefaces, and tone of voice. A disconnect between your standee and other brand materials can weaken trust and reduce overall recognition.

Create The Perfect Standee For Your Brand With Leadcrew

A great standee starts with strong branding. At Leadcrew, we provide professional brand identity services that ensure your visuals, from logos to standees, look sharp, consistent, and unforgettable. Contact our team today.

frequently asked questions (FAQs)

What is the best size for a standee?
The ideal standee size depends on your purpose and display location. However, a standard standee size like 33 x 78 inches is commonly used for events and retail spaces due to its ideal balance between visibility and portability. Always choose a size based on your venue and viewing distance.
What resolution should I use for standee design?
For clear and professional print quality, design your artwork at 150 DPI (dots per inch) using the correct standee size in pixels. For example, a 33 x 78 inch standee should be designed at 4950 x 11700 pixels to maintain sharpness when printed.
Can I use too much text on a standee?
Yes, and it's a common mistake. Standees are meant for quick communication, so keep your message short and impactful. Use bold headings, minimal text, and clear calls to action to ensure your message is easily understood in just a few seconds.
What file format should I use for printing my standee?
Most professional printers prefer PDF, TIFF, or AI (Adobe Illustrator) files with CMYK color mode and proper bleed margins. Always check with your printing provider for exact specifications based on your chosen standee size in inches.
Can I reuse a standee for multiple events?
If your design is general enough, like featuring your brand, core products, or evergreen messages, you can reuse it for various events. Just ensure it’s printed on durable material and stored properly to extend its life.

Tags: